2.3 实践学习体验:人脸识别 
本节将使用Adam Geitgey开发的一个广泛使用的人脸检测和操作库face-recognition,用来检测到人脸周围,并可以定制不同颜色和边框形状的图像。首先,将有用的库函数导入到我们的python代码中。
import PIL.Image
import PIL.ImageDraw
import face_recognition
请在代码文件的同一文件夹中选择名为SchoolKids.jpg的图片(你可以选择任何图片),或给出图片的正确路径。选定的图像将由face-recognition库的load_image_file()方法加载,该方法将把它转换成该图像的NumPy数组。然后我们可以把它赋值给变量名.
given_image = face_recognition.load_image_file('SchoolKids.jpg')
使用同一库中的face_locations()方法,我们将统计given_image中的面孔数量,并打印出在图像中发现的总面孔长度。
face_locations = face_recognition.face_locations(given_image)
number_of_faces = len(face_locations)
print("We found {} face(s) in this image.".format(number_of_faces))
相应地,为了在图像上绘制任意形状,我们将使用PIL.Image中的fromarray()方法将图像转换为Pillow库对象。
pil_image = PIL.Image.fromarray(given_image)
然后,我们将运行一个for-in循环来打印检测到的人脸的上、左、下、右四个像素位置。
for face_location in face_locations:
top, left, bottom, right = face_location
print("A face is detected at pixel location Top: {}, Left: {}, Bottom: {}, --Right:{}".format(top, left, bottom, right))
我们将在人脸的周围画一个宽度为10的绿色矩形框。
draw = PIL.ImageDraw.Draw(pil_image)
draw.rectangle([left, top, right, bottom],outline="green", width=10)
现在,只需使用变量pil_image来显示我们的新图像,检测到的人脸周围使用矩形边框。
pil_image.show()
新的临时图像将在您的计算机上自动打开(如果一切设置正确)。它应该像图13一样。
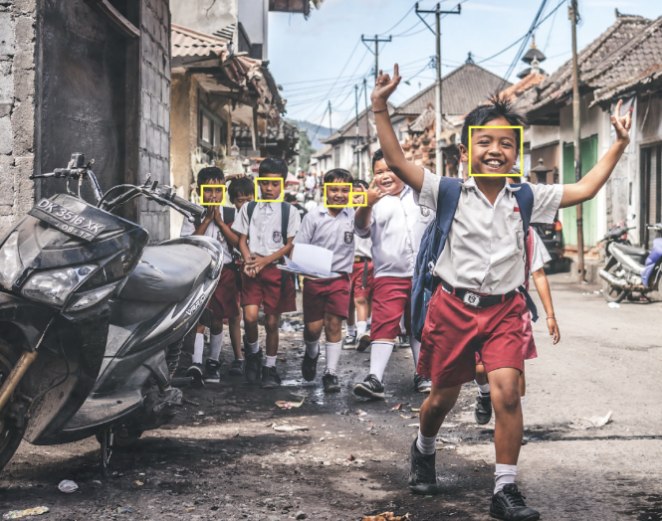
图13.在给定图片中进行人脸检测的例子
如果你运行上面的文件,一切正常,你将在编辑器的控制台得到下面的输出:
We found 5 face(s) in this image.
A face is detected at pixel location Top: 1454, Left: 3451, Bottom: 1775, Right: 3130
A face is detected at pixel location Top: 1784, Left: 1904, Bottom: 1939, Right: 1749
A face is detected at pixel location Top: 1818, Left: 2351, Bottom: 1973, Right: 2196
A face is detected at pixel location Top: 1830, Left: 1529, Bottom: 1959, Right: 1400
A face is detected at pixel location Top: 1878, Left: 2445, Bottom: 1967, Right: 2355
测试
请在我们的jupyter服务器上测试代码并进行练习,默认账户名yuanzhuo,默认密码yuanzhuo. 请将kernel设置为conda-yuanzhuo. Yuanzhuo Online Code Platform
测验
请选择不正确的说法:
人脸识别有什么作用?